
This year, I have seen quite a few felt Easter baskets for sale. I looked at them and knew that you can easily make your own for less! I feel that if you can make something more personalized for a cheaper price, the choice is a no-brainer.
All you will need is some felt, embroidery thread with a needle, scissors, some thin cardboard (found from used cereal boxes, tissue boxes, etc), and a basket or container to use as a guide. (You can still make your own without a guide, just know that you will want to have some sort of pattern. If you would like me to scan and upload mine, just leave me a comment) Also, for my felt, I bought four pieces of my main color and a piece for each of the accent colors. And now, here are the steps to make your own:
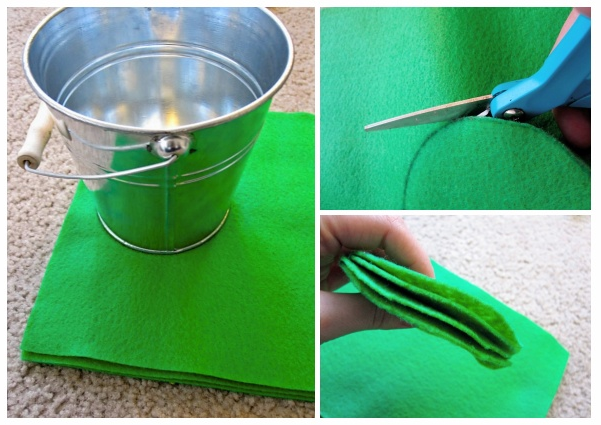
 If you already have an Easter basket that you want to use as a guide, trace the base of the basket onto a piece of your main colored felt. Then stack the felt and cut your base out of all four pieces of that color. Alternatively, you can ensure that your basket base is sturdy enough by using only two pieces of cut felt along with a piece of thin cardboard. If you choose to use this method, make sure you cut the cardboard base slightly smaller than the felt base so that you can sandwich and sew around the edges. Now that we have prepared our base, we will move on to the sides:
 Place your Easter basket guide on its side onto your felt. Starting in the center, trace the top rim of your guide as you roll it on your felt piece. Then start back at center and repeat this step, rolling the basket the other way. Now that you have traced the top rim, repeat these steps while tracing the bottom rim. Once finished, you should have something that looks like this:
 Stack four pieces of felt on top of each other and cut out your newly traced shape. Because my basket ended up being fairly small, the sides were sturdy enough being only two pieces of felt thick, but if you want your baskets to be very sturdy, you can use thin cardboard and cut out the traced shape onto two pieces of cardboard (again, making sure the pieces are slightly smaller than the felt).
 Now it is time to start stitching things together. First you will want to stitch together the sides of the basket, but only on one side. Laying the four stacks on top of each other, stitch about a quarter-half inch from the edge. I chose to use a loop stitch, but you can also use a simple stitch as well. Now that you have made this stitch, pin the other edge of the side pieces together. Split open the pieces into two groups (two felt pieces each) and let it stand on. Not only will this help you visualize your finished basket, but it is easier to start attaching your base this way. Flip your sides over to the unfinished basket is upside down. Place your base felt pieces on top. Starting at the pinned seam of the basket (the side that you did not sew), stitch the base to the sides. Soon, you will have stitched around your base and will end up at the other side of the pinned seam. Depending on where you stitched the side seam, you may have a bit of extra felt (almost like a bubble of felt) left over. Just unpin the seam and let the felt set so it can be sewn flush against the base, and stitch.
Whew, you now have the base and sides of the basket done! It is downhill from here, I promise. To make the handle, cut your felt into two thin rectangular pieces. Make them as long as you want your handle to be. If your felt pieces are not long enough, just cut four pieces and stitch two together so they are twice as long. Now, cut your thin cardboard into the same shape, making sure it is slightly smaller than the felt pieces. Stitch the felt pieces of your handle together around the outside edges of your rectangles. Leave 2-3 inches unstitched. Take your thin cardboard handle piece and slide it in between the felt pieces of your handle and stitch up the remaining 2-3 inches.
 At this point, I recommend decorating your basket before you attach your handle. This way, you can add a contrasting rim of felt. To add your decorations, you just cut out your shapes from your felt, and use white glue to attach. I chose to hand-stitch my pieces to my basket to be certain that it would stay intact. A great idea would be to cut out shapes and let your child glue them where he/she wants them to go. Then after you can stitch them so they are securely on.
 Okay, so now you have decorated your Easter basket, all that is left is attaching your handle! This just takes a simple stitch and you're done! Now you can fill your felt Easter basket with your homemade Easter grass and other lovely treats :)
I hope you enjoyed my tutorial showing you how to make your own felt Easter basket. Be sure to check back soon for more Easter ideas! ♡
 |
| I made this basket for my Packers-loving boyfriend |


Whew, you now have the base and sides of the basket done! It is downhill from here, I promise. To make the handle, cut your felt into two thin rectangular pieces. Make them as long as you want your handle to be. If your felt pieces are not long enough, just cut four pieces and stitch two together so they are twice as long. Now, cut your thin cardboard into the same shape, making sure it is slightly smaller than the felt pieces. Stitch the felt pieces of your handle together around the outside edges of your rectangles. Leave 2-3 inches unstitched. Take your thin cardboard handle piece and slide it in between the felt pieces of your handle and stitch up the remaining 2-3 inches.


Awesome.work.
ReplyDeleteI have been looking for a tutorial for making felt baskets....thanks a ton. Pl share some more pics of stitched basket without base attached and with base. It will be more helpful for us.